CatWalk XT Camera Not Detected
When CatWalk opens, the camera status appears in the lower-right corner. If it displays "Camera detected: No", the camera is not recognized, and acquisition cannot proceed. However, classification and analysis remain available without the camera.
Common Causes
- Camera has no power
- Camera is still establishing a connection
- Camera is connected to the wrong port
- Camera configuration is incorrect
1. Basic Requirements and Reconnecting
The camera must be powered on and connected before launching CatWalk. After powering on, wait up to 2 minutes for the camera to initialize.
Once ready, go to Setup > Camera, select Gevicam, and click Refresh. Alternatively, close and reopen CatWalk XT.
2. Camera Has No Power
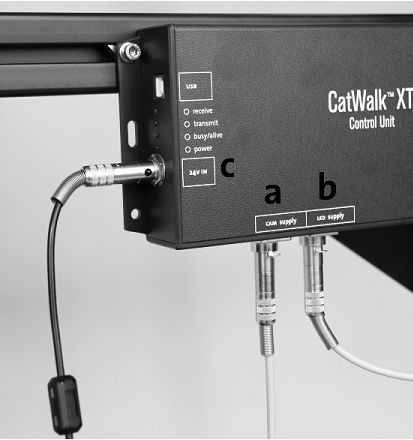
The camera receives power from the Control Unit (mounted at knee level on the CatWalk frame's left side). Ensure:
- The Control Unit power switch is turned on.
- The power cable is securely connected.
- The walkway LEDs are illuminated (green/red).
If your system has a second power switch near the glass plate, that switch should also remain on.
Note: The walkway lights need ~15 minutes to reach full brightness. Turn on the walkway at least 15 minutes before acquisition or adjusting detection settings.
3. Camera Is Connected to the Wrong Port
The camera uses two cables:
- Power cable: tan-colored, plugs into the Control Unit’s Cam Supply port.
- Network cable: connects directly to a specific PC network port labeled CatWalk Network.
Do not plug the network cable into the Control Unit. Doing so may damage the camera.
Computers from Noldus have two network ports:
- One near the USB ports – not for the CatWalk camera.
- One lower down, near metal slots – labeled for CatWalk. Use this port.
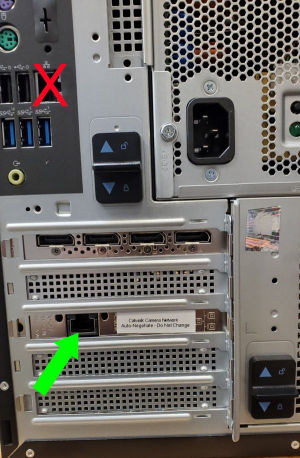
When connected properly, a green LED will be visible at the camera’s network port (facing the floor), confirming connection to the computer.
4. Testing the Camera Directly
- Close CatWalk XT.
- Open GEV Player from the Start Menu under Pleora Technologies.
- Click Select/Connect.
- Choose the eBus Interface and its listed device, then click OK.
- Click Play to verify video feed. If successful, click Stop, close GEV Player, and re-launch CatWalk.
5. Reinstalling the Camera Driver
- Open Pleora Technologies > Driver Installation Tool from the Start Menu.
- In the list of network adapters, find the one labeled Intel Gigabit CT Desktop.
- If eBus Universal Pro Driver is not selected, choose it from the Action column and click Install.
- Restart the computer after installation completes.
