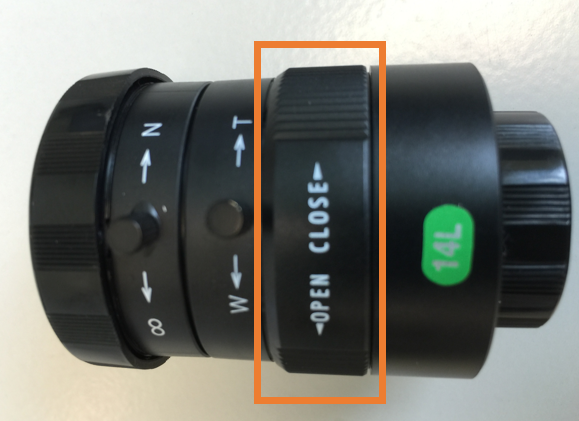
Solution #1: Open the Aperture on the Lens More
- Twist the aperture ring on the camera lens toward “Open” until the image reaches the desired brightness in your Noldus software.
Solution #2: Increase the Gain and/or Exposure in Pylon
- Close your Noldus software (e.g., MediaRecorder or EthoVision XT).
- Open the Basler Pylon Viewer software. This can typically be found on your desktop or in the Start menu under Basler.
- Note: Pylon Viewer is installed automatically with the camera drivers.
- Go to Tools > Options and set User Level to Expert or Guru.

- In the Devices panel, double-click the Basler device listed under GigE or USB.
- In the Features panel, open the Basler camera section and double-click Analog Controls.
- Note: If the Features panel is not visible, go to Window > Features to enable it.
Increasing the Gain
- Under Analog Control, increase Gain (Raw) to a value up to 2.
- Note: Higher gain brightens the image but may increase noise or graininess.

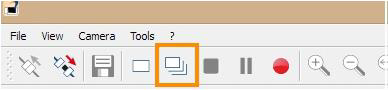
- Click Continuous Shot to see the live video with your changes.
Increasing the Exposure
- Ensure Exposure Auto is set to Off.
- Set the Exposure Time (Abs) [us] to your desired value (in microseconds) and press Tab to confirm.
- Note: Higher exposure = brighter image. Too high may drop frames. Too low may cause flickering.
Recommended exposure ranges:
- Non-DanioVision: 8,000–25,000 (depending on lighting and gain)
- IR Lighting (NIR GigE): ~30,000
- DanioVision: 4,000 (1280×960) or 2,000 (640×480)
- Click Continuous Shot again to verify the new frame rate.
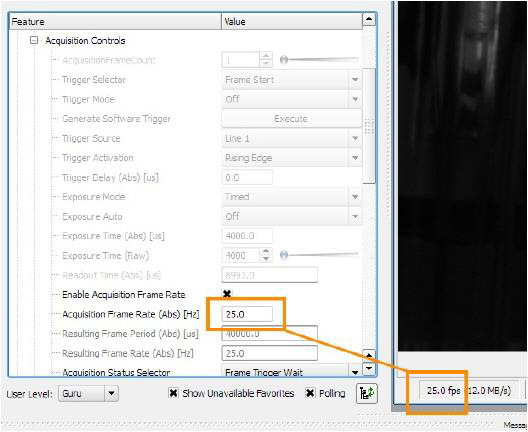
- Check that the actual frame rate matches your Acquisition Frame Rate (Abs) [Hz] setting (typically 25 or 30). If it's lower, stop Continuous Shot and try one of the following:

- a. Lower the exposure time and increase Gain instead
- b. Open the lens diaphragm if not already done
- c. Lower the video resolution under AOI Controls by reducing Width and Height
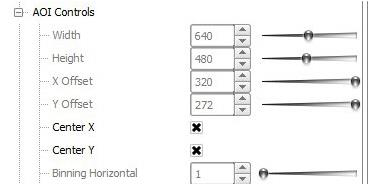
- Note: Lowering resolution zooms in the image. Ensure Center X and Center Y are enabled.
Repeat the above adjustments until the desired frame rate is achieved.
Save Camera Settings to User Set
- Once satisfied with gain and exposure settings, stop Continuous Shot.
- Open Configuration Sets:
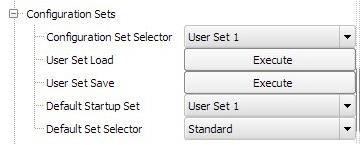
- Select User Set 1 from the Configuration Set Selector
- Click Execute next to User Set Save
- Set User Set 1 as the Default Startup Set
- Close Pylon Viewer
- Note: These settings will now load automatically each time Noldus software starts.
Tip: You can save additional configurations to User Set 2 and User Set 3. Use the Default Startup Set option to choose which one should load by default.